创建List
编写: roya 原文:https://developer.android.com/training/wearables/ui/lists.html
List让用户在可穿戴设备上很容易地从一组选项中选择一个项目。这个课程介绍了如何在Android Wear应用中创建List。
Wearable UI库包含了WearableListView类,该类是对可穿戴设备进行优化的List实现。
Note: Android SDK 中的
Notifications例子示范了如何在应用中使用WearableListView。这个例子的位于android-sdk/samples/android-20/wearable/Notifications目录。
为了在Android Wear应用中创建List,我们需要:
- 添加
WearableListView元素到activity的layout定义中。 - 为List选项创建一个自定义的layout实现。
- 使用这个实现为List选项创建一个layout定义文件。
- 创建一个adapter以填充List。
- 指定这个adapter到
WearableListView元素。
下面的章节有这些步骤的详细描述。
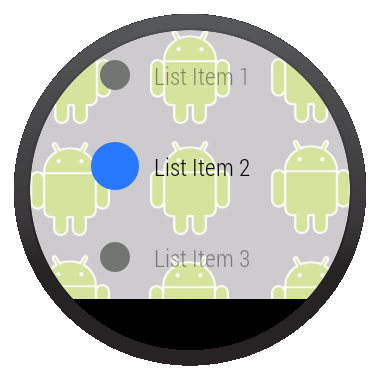
Figure 3: 在Android Wear上的List View.
添加List View
下面的layout使用BoxInsetLayout添加了一个List view到activity中,所以这个List可以正确地显示在圆形和方形两种设备上:
<android.support.wearable.view.BoxInsetLayout
    xmlns:android="http://schemas.android.com/apk/res/android"
    xmlns:app="http://schemas.android.com/apk/res-auto"
    android:background="@drawable/robot_background"
    android:layout_height="match_parent"
    android:layout_width="match_parent">

    <FrameLayout
        android:id="@+id/frame_layout"
        android:layout_height="match_parent"
        android:layout_width="match_parent"
        app:layout_box="left|bottom|right">

        <android.support.wearable.view.WearableListView
            android:id="@+id/wearable_list"
            android:layout_height="match_parent"
            android:layout_width="match_parent">
        </android.support.wearable.view.WearableListView>
    </FrameLayout>
</android.support.wearable.view.BoxInsetLayout>
为List选项创建一个Layou实现
在许多例子中,每个List选项都由一个图标和一个描述组成。Android SDK中的Notifications 例子实现了一个自定义layout:继承LinearLayout以合并两元素到每个List选项。这个layout也实现了 WearableListView.OnCenterProximityListener接口里的方法,以实现在用户在List中滚动时,因WearableListView的事件而改变选项图标颜色和渐隐文字:
public class WearableListItemLayout extends LinearLayout
             implements WearableListView.OnCenterProximityListener {

    private ImageView mCircle;
    private TextView mName;

    private final float mFadedTextAlpha;
    private final int mFadedCircleColor;
    private final int mChosenCircleColor;

    public WearableListItemLayout(Context context) {
        this(context, null);
    }

    public WearableListItemLayout(Context context, AttributeSet attrs) {
        this(context, attrs, 0);
    }

    public WearableListItemLayout(Context context, AttributeSet attrs,
                                  int defStyle) {
        super(context, attrs, defStyle);

        mFadedTextAlpha = getResources()
                         .getInteger(R.integer.action_text_faded_alpha) / 100f;
        mFadedCircleColor = getResources().getColor(R.color.grey);
        mChosenCircleColor = getResources().getColor(R.color.blue);
    }

    // Get references to the icon and text in the item layout definition
    @Override
    protected void onFinishInflate() {
        super.onFinishInflate();
        // These are defined in the layout file for list items
        // (see next section)
        mCircle = (ImageView) findViewById(R.id.circle);
        mName = (TextView) findViewById(R.id.name);
    }

    @Override
    public void onCenterPosition(boolean animate) {
        mName.setAlpha(1f);
        ((GradientDrawable) mCircle.getDrawable()).setColor(mChosenCircleColor);
    }

    @Override
    public void onNonCenterPosition(boolean animate) {
        ((GradientDrawable) mCircle.getDrawable()).setColor(mFadedCircleColor);
        mName.setAlpha(mFadedTextAlpha);
    }
}
我们也可以创建animator对象以放大List中间选项的图标。我们可以使用WearableListView.OnCenterProximityListener接口的onCenterPosition()和 onNonCenterPosition()回调方法来管理animator对象。更多关于animator对象的信息请查看Animating with ObjectAnimator
为Items创建Layout解释
在为List选项实现自定义layout之后,我们需要提供一个layout解释文件以具体说明list item中的组件参数。下面的layout使用先前的自定义layout实现,并且定义图标和文本view,这两个view的ID对应layout实现类的ID:
res/layout/list_item.xml
<com.example.android.support.wearable.notifications.WearableListItemLayout
    xmlns:android="http://schemas.android.com/apk/res/android"
    android:gravity="center_vertical"
    android:layout_width="match_parent"
    android:layout_height="80dp">
    <ImageView
        android:id="@+id/circle"
        android:layout_height="20dp"
        android:layout_margin="16dp"
        android:layout_width="20dp"
        android:src="@drawable/wl_circle"/>
    <TextView
        android:id="@+id/name"
        android:gravity="center_vertical|left"
        android:layout_width="wrap_content"
        android:layout_marginRight="16dp"
        android:layout_height="match_parent"
        android:fontFamily="sans-serif-condensed-light"
        android:lineSpacingExtra="-4sp"
        android:textColor="@color/text_color"
        android:textSize="16sp"/>
</com.example.android.support.wearable.notifications.WearableListItemLayout>
创建Adapter以填充List
Adapter用内容填充WearableListView。下面的adapter基于strings数组元素填充了List:
private static final class Adapter extends WearableListView.Adapter {
    private String[] mDataset;
    private final Context mContext;
    private final LayoutInflater mInflater;

    // Provide a suitable constructor (depends on the kind of dataset)
    public Adapter(Context context, String[] dataset) {
        mContext = context;
        mInflater = LayoutInflater.from(context);
        mDataset = dataset;
    }

    // Provide a reference to the type of views you're using
    public static class ItemViewHolder extends WearableListView.ViewHolder {
        private TextView textView;
        public ItemViewHolder(View itemView) {
            super(itemView);
            // find the text view within the custom item's layout
            textView = (TextView) itemView.findViewById(R.id.name);
        }
    }

    // Create new views for list items
    // (invoked by the WearableListView's layout manager)
    @Override
    public WearableListView.ViewHolder onCreateViewHolder(ViewGroup parent,
                                                          int viewType) {
        // Inflate our custom layout for list items
        return new ItemViewHolder(mInflater.inflate(R.layout.list_item, null));
    }

    // Replace the contents of a list item
    // Instead of creating new views, the list tries to recycle existing ones
    // (invoked by the WearableListView's layout manager)
    @Override
    public void onBindViewHolder(WearableListView.ViewHolder holder,
                                 int position) {
        // retrieve the text view
        ItemViewHolder itemHolder = (ItemViewHolder) holder;
        TextView view = itemHolder.textView;
        // replace text contents
        view.setText(mDataset[position]);
        // replace list item's metadata
        holder.itemView.setTag(position);
    }

    // Return the size of your dataset
    // (invoked by the WearableListView's layout manager)
    @Override
    public int getItemCount() {
        return mDataset.length;
    }
}
连接Adapter和设置Click Listener
在我们的activity中,从layout中取得WearableListView元素的引用,分配一个adapter实例以填充List,然后设置一个click listener以完成当用户选择了一个特定的List选项的动作。
public class WearActivity extends Activity
                          implements WearableListView.ClickListener {

    // Sample dataset for the list
    String[] elements = { "List Item 1", "List Item 2", ... };

    @Override
    protected void onCreate(Bundle savedInstanceState) {
        super.onCreate(savedInstanceState);
        setContentView(R.layout.my_list_activity);

        // Get the list component from the layout of the activity
        WearableListView listView =
            (WearableListView) findViewById(R.id.wearable_list);

        // Assign an adapter to the list
        listView.setAdapter(new Adapter(this, elements));

        // Set a click listener
        listView.setClickListener(this);
    }

    // WearableListView click listener
    @Override
    public void onClick(WearableListView.ViewHolder v) {
        Integer tag = (Integer) v.itemView.getTag();
        // use this data to complete some action ...
    }

    @Override
    public void onTopEmptyRegionClick() {
    }
}