绘制表盘
编写:heray1990 - 原文: http://developer.android.com/training/wearables/watch-faces/drawing.html
配置完工程和添加了实现表盘服务(watch face service)的类之后,我们可以开始编写初始化和绘制自定义表盘的代码了。
这节课通过 Android SDK 中的 WatchFace 示例,来介绍系统是如何调用表盘服务的方法。这个示例位于 android-sdk/samples/android-21/wearable/WatchFace 目录。这里描述服务实现的很多方面(例如初始化和检测设备功能)可以应用到任意表盘,所以我们可以重用一些代码到我们的表盘当中。
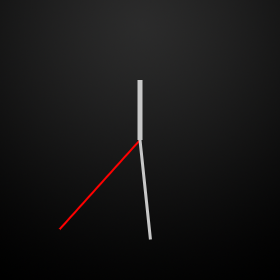
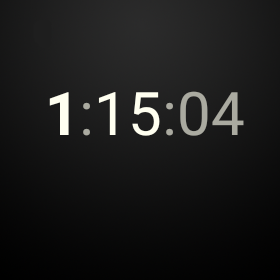
Figure 1. WatchFace 示例中的模拟和数字表盘
初始化表盘
当系统加载我们的服务时,我们应该分配和初始化表盘需要的大部分资源,包括加载位图资源、创建定时器对象来运行自定义动画、配置颜色风格和执行其他运算。我们通常只执行一次这些操作和重用它们的结果。这个习惯可以提高表盘的性能并且更容易地维护代码。
初始化表盘,需要:
- 为自定义定时器、图形对象和其它组件声明变量。
- 在
Engine.onCreate()方法中初始化表盘组件。 - 在
Engine.onVisibilityChanged()方法中初始化自定义定时器。
下面的部分详细介绍了上述几个步骤。
声明变量
当系统加载我们的服务时,我们初始化的那些资源需要在我们实现的不同点都可以被访问,所以我们可以重用这些资源。我们可以通过在 WatchFaceService.Engine 实现中为这些资源声明成员变量来达到上述目的。
为下面的组件声明变量:
图形对象
大部分表盘至少包含一个位图用于表盘的背景,如创建实施策略描述的一样。我们可以使用额外的位图图像来表示表盘的时钟指针或者其它设计元素。
定时计时器
当时间变化时,系统每隔一分钟会通知表盘一次,但一些表盘会根据自定义的时间间隔来运行动画。在这种情况下,我们需要用一个按照所需频率计数的自定义定时器来刷新表盘。
时区变化接收器
用户可以在旅游的时候调整时区,系统会广播这个事件。我们的服务实现必须注册一个广播接收器,该广播接收器用于接收时区改变或者更新时间的通知。
WatchFace 示例中的 AnalogWatchFaceService.Engine 类定义了上述变量(见下面的代码)。自定义定时器实现为一个 Handler 实例,该 Handler 实例使用线程的消息队列发送和处理延迟的消息。对于这个特定的表盘,自定义定时器每秒计数一次。当定时器计数,handler 调用 invalidate() 方法,然后系统调用 onDraw() 方法重新绘制表盘。
private class Engine extends CanvasWatchFaceService.Engine {
    static final int MSG_UPDATE_TIME = 0;

    /* a time object */
    Time mTime;

    /* device features */
    boolean mLowBitAmbient;

    /* graphic objects */
    Bitmap mBackgroundBitmap;
    Bitmap mBackgroundScaledBitmap;
    Paint mHourPaint;
    Paint mMinutePaint;
    ...

    /* handler to update the time once a second in interactive mode */
    final Handler mUpdateTimeHandler = new Handler() {
        @Override
        public void handleMessage(Message message) {
            switch (message.what) {
                case MSG_UPDATE_TIME:
                    invalidate();
                    if (shouldTimerBeRunning()) {
                        long timeMs = System.currentTimeMillis();
                        long delayMs = INTERACTIVE_UPDATE_RATE_MS
                                - (timeMs % INTERACTIVE_UPDATE_RATE_MS);
                        mUpdateTimeHandler
                            .sendEmptyMessageDelayed(MSG_UPDATE_TIME, delayMs);
                    }
                    break;
            }
        }
    };

    /* receiver to update the time zone */
    final BroadcastReceiver mTimeZoneReceiver = new BroadcastReceiver() {
        @Override
        public void onReceive(Context context, Intent intent) {
            mTime.clear(intent.getStringExtra("time-zone"));
            mTime.setToNow();
        }
    };

    /* service methods (see other sections) */
    ...
}
初始化表盘组件
在为位图资源、色彩风格和其它每次重新绘制表盘都会重用的组件声明成员变量之后,在系统加载服务时初始化这些组件。只初始化这些组件一次,然后重用它们以提升性能和电池使用时间。
在 Engine.onCreate() 方法中,初始化下面的组件:
- 加载背景图片。
- 创建风格和色彩来绘制图形对象。
- 分配一个对象来保存时间。
- 配置系统 UI。
在 AnalogWatchFaceService 类的 Engine.onCreate() 方法初始化这些组件的代码如下:
@Override
public void onCreate(SurfaceHolder holder) {
    super.onCreate(holder);

    /* configure the system UI (see next section) */
    ...

    /* load the background image */
    Resources resources = AnalogWatchFaceService.this.getResources();
    Drawable backgroundDrawable = resources.getDrawable(R.drawable.bg);
    mBackgroundBitmap = ((BitmapDrawable) backgroundDrawable).getBitmap();

    /* create graphic styles */
    mHourPaint = new Paint();
    mHourPaint.setARGB(255, 200, 200, 200);
    mHourPaint.setStrokeWidth(5.0f);
    mHourPaint.setAntiAlias(true);
    mHourPaint.setStrokeCap(Paint.Cap.ROUND);
    ...

    /* allocate an object to hold the time */
    mTime = new Time();
}
当系统初始化表盘时,只会加载背景位图一次。图形风格被 Paint 类实例化。然后我们在 Engine.onDraw() 方法中使用这些风格来绘制表盘的组件,如绘制表盘描述的那样。
初始化自定义定时器
作为表盘开发者,我们通过使定时器按照要求的频率计数,来决定设备在交互模式时多久更新一次表盘。这使得我们可以创建自定义的动画和其它视觉效果。
Note: 在环境模式下,系统不会可靠地调用自定义定时器。关于在环境模式下更新表盘的内容,请看在环境模式下更新表盘。
在声明变量部分介绍了一个 AnalogWatchFaceService 类定义的每秒计数一次的定时器例子。在 Engine.onVisibilityChanged() 方法里,如果满足如下两个条件,则启动自定义定时器:
- 表盘可见的。
- 设备处于交互模式。
如果有必要,AnalogWatchFaceService 会调度下一个定时器进行计数:
private void updateTimer() {
    mUpdateTimeHandler.removeMessages(MSG_UPDATE_TIME);
    if (shouldTimerBeRunning()) {
        mUpdateTimeHandler.sendEmptyMessage(MSG_UPDATE_TIME);
    }
}

private boolean shouldTimerBeRunning() {
    return isVisible() && !isInAmbientMode();
}
该自定义定时器每秒计数一次,如声明变量介绍的一样。
在 Engine.onVisibilityChanged() 方法中,按要求启动定时器并为时区的变化注册接收器:
@Override
public void onVisibilityChanged(boolean visible) {
    super.onVisibilityChanged(visible);

    if (visible) {
        registerReceiver();

        // Update time zone in case it changed while we weren't visible.
        mTime.clear(TimeZone.getDefault().getID());
        mTime.setToNow();
    } else {
        unregisterReceiver();
    }

    // Whether the timer should be running depends on whether we're visible and
    // whether we're in ambient mode), so we may need to start or stop the timer
    updateTimer();
}
当表盘可见时,onVisibilityChanged() 方法为时区变化注册了接收器,并且如果设备在交互模式,则启动自定义定时器。当表盘不可见,这个方法停止自定义定时器并且注销检测时区变化的接收器。下面是registerReceiver() 和 unregisterReceiver() 方法的实现:
private void registerReceiver() {
    if (mRegisteredTimeZoneReceiver) {
        return;
    }
    mRegisteredTimeZoneReceiver = true;
    IntentFilter filter = new IntentFilter(Intent.ACTION_TIMEZONE_CHANGED);
    AnalogWatchFaceService.this.registerReceiver(mTimeZoneReceiver, filter);
}

private void unregisterReceiver() {
    if (!mRegisteredTimeZoneReceiver) {
        return;
    }
    mRegisteredTimeZoneReceiver = false;
    AnalogWatchFaceService.this.unregisterReceiver(mTimeZoneReceiver);
}
在环境模式下更新表盘
在环境模式下,系统每分钟调用一次 Engine.onTimeTick() 方法。通常在这种模式下,每分钟更新一次表盘已经足够了。为了在环境模式下更新表盘,我们必须使用一个在初始化自定义定时器介绍的自定义定时器。
在环境模式下,大部分表盘实现在 Engine.onTimeTick() 方法中简单地销毁画布来重新绘制表盘:
@Override
public void onTimeTick() {
    super.onTimeTick();

    invalidate();
}
配置系统 UI
表盘不应该干涉系统 UI 组件,在 Accommodate System UI Element 中有介绍。如果我们的表盘背景比较亮或者在屏幕的底部附近显示了信息,那么我们可能要配置 notification cards 的尺寸或者启用背景保护。
当表盘在动的时候,Android Wear 允许我们配置系统 UI 的下面几个方面:
- 指定第一个 notification card 离屏幕有多远。
- 指定系统是否将时间绘制在表盘上。
- 在环境模式下,显示或者隐藏 notification card。
- 用纯色背景保护系统指针。
- 指定系统指针的位置。
为了配置这些方面的系统 UI,需要创建一个 WatchFaceStyle 实例并且将其传进 Engine.setWatchFaceStyle() 方法。
下面是 AnalogWatchFaceService 类配置系统 UI 的方法:
@Override
public void onCreate(SurfaceHolder holder) {
    super.onCreate(holder);

    /* configure the system UI */
    setWatchFaceStyle(new WatchFaceStyle.Builder(AnalogWatchFaceService.this)
            .setCardPeekMode(WatchFaceStyle.PEEK_MODE_SHORT)
            .setBackgroundVisibility(WatchFaceStyle
                                    .BACKGROUND_VISIBILITY_INTERRUPTIVE)
            .setShowSystemUiTime(false)
            .build());
    ...
}
上述的代码将 card 配置成一行高,card 的背景只会简单地显示和只用于中断的 notification,不会显示系统时间(因为表盘会绘制自己的时间)。
我们可以在表盘实现的任意时刻配置系统的 UI 风格。例如,如果用户选择了白色背景,我们可以为系统指针添加背景保护。
更多关于配置系统 UI 的内容,请见 WatchFaceStyle 类的 API 参考文档。
获得设备屏幕信息
当系统确定了设备屏幕的属性时,系统会调用 Engine.onPropertiesChanged() 方法,例如设备是否使用低比特率的环境模式和屏幕是否需要烧毁保护。
下面的代码介绍如何获得这些属性:
@Override
public void onPropertiesChanged(Bundle properties) {
    super.onPropertiesChanged(properties);
    mLowBitAmbient = properties.getBoolean(PROPERTY_LOW_BIT_AMBIENT, false);
    mBurnInProtection = properties.getBoolean(PROPERTY_BURN_IN_PROTECTION,
            false);
}
当绘制表盘时,我们应该考虑这些设备属性。
- 对于使用低比特率环境模式的设备,屏幕在环境模式下为每种颜色提供更少的比特,所以当设备切换到环境模式时,我们应该禁用抗锯齿和位图滤镜。
- 对于要求烧毁保护的设备,在环境模式下避免使用大块的白色像素,并且不要将内容放在离屏幕边缘 10 个像素范围内,因为系统会周期地改变内容以避免像素烧毁。
更多关于低比特率环境模式和烧毁保护的内容,请见 Optimize for Special Screens。更多关于如何禁用位图滤镜的内容,请见位图滤镜
响应两种模式间的变化
当设备在环境模式和交互模式之间转换时,系统会调用 Engine.onAmbientModeChanged() 方法。我们的服务实现应该对在两种模式间切换作出必要的调整,然后调用 invalidate() 方法来重新绘制表盘。
下面的代码介绍了这个方法如何在 WatchFace 示例的 AnalogWatchFaceService 类中实现:
@Override
public void onAmbientModeChanged(boolean inAmbientMode) {

    super.onAmbientModeChanged(inAmbientMode);

    if (mLowBitAmbient) {
        boolean antiAlias = !inAmbientMode;
        mHourPaint.setAntiAlias(antiAlias);
        mMinutePaint.setAntiAlias(antiAlias);
        mSecondPaint.setAntiAlias(antiAlias);
        mTickPaint.setAntiAlias(antiAlias);
    }
    invalidate();
    updateTimer();
}
这个例子对一些图形风格做出了调整和销毁画布,使得系统可以重新绘制表盘。
绘制表盘
绘制自定义的表盘,系统调用带有 Canvas 实例和绘制表盘所在的 bounds 两个参数的 Engine.onDraw() 方法。bounds 参数说明任意内插的区域,如一些圆形设备底部的“下巴”。我们可以像下面介绍的一样来使用画布绘制表盘:
- 如果是首次调用
onDraw()方法,缩放背景来匹配它。 - 检查设备处于环境模式还是交互模式。
- 处理任何图形计算。
- 在画布上绘制背景位图。
- 使用 Canvas 类中的方法绘制表盘。
在 WatchFace 示例中的 AnalogWatchFaceService 类按照如下这些步骤来实现 onDraw() 方法:
@Override
public void onDraw(Canvas canvas, Rect bounds) {
    // Update the time
    mTime.setToNow();

    int width = bounds.width();
    int height = bounds.height();

    // Draw the background, scaled to fit.
    if (mBackgroundScaledBitmap == null
        || mBackgroundScaledBitmap.getWidth() != width
        || mBackgroundScaledBitmap.getHeight() != height) {
        mBackgroundScaledBitmap = Bitmap.createScaledBitmap(mBackgroundBitmap,
                                         width, height, true /* filter */);
    }
    canvas.drawBitmap(mBackgroundScaledBitmap, 0, 0, null);

    // Find the center. Ignore the window insets so that, on round watches
    // with a "chin", the watch face is centered on the entire screen, not
    // just the usable portion.
    float centerX = width / 2f;
    float centerY = height / 2f;

    // Compute rotations and lengths for the clock hands.
    float secRot = mTime.second / 30f * (float) Math.PI;
    int minutes = mTime.minute;
    float minRot = minutes / 30f * (float) Math.PI;
    float hrRot = ((mTime.hour + (minutes / 60f)) / 6f ) * (float) Math.PI;

    float secLength = centerX - 20;
    float minLength = centerX - 40;
    float hrLength = centerX - 80;

    // Only draw the second hand in interactive mode.
    if (!isInAmbientMode()) {
        float secX = (float) Math.sin(secRot) * secLength;
        float secY = (float) -Math.cos(secRot) * secLength;
        canvas.drawLine(centerX, centerY, centerX + secX, centerY +
                        secY, mSecondPaint);
    }

    // Draw the minute and hour hands.
    float minX = (float) Math.sin(minRot) * minLength;
    float minY = (float) -Math.cos(minRot) * minLength;
    canvas.drawLine(centerX, centerY, centerX + minX, centerY + minY,
                    mMinutePaint);
    float hrX = (float) Math.sin(hrRot) * hrLength;
    float hrY = (float) -Math.cos(hrRot) * hrLength;
    canvas.drawLine(centerX, centerY, centerX + hrX, centerY + hrY,
                    mHourPaint);
}
这个方法根据现在的时间计算时钟指针的位置和使用在 onCreate() 方法中初始化的图形风格将时钟指针绘制在背景位图之上。其中,秒针只会在交互模式下绘制出来,环境模式不会显示。
更多的关于用 Canvas 实例绘制的内容,请见 Canvas and Drawables。
在 Android SDK 的 WatchFace 示例包括附加的表盘,我们可以用作如何实现 onDraw() 方法的例子。